How do I apply for enrolment as a GST Practitioner?
This document covers the User Manual for when a GST Practitioner files an application for Enrolment as a GST Practitioner under the provisions of GST Act. The document will help the users of the GST System Portal to understand and easily use the GST System Portal.
Video to apply for GST Practitioner
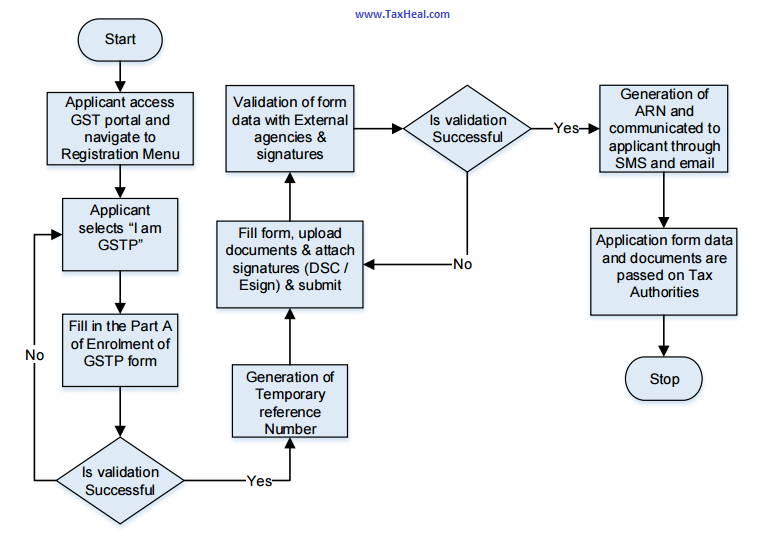
What are the steps involved in applying for Registration as a GST Practitioner (GSTP) on the GST Portal?
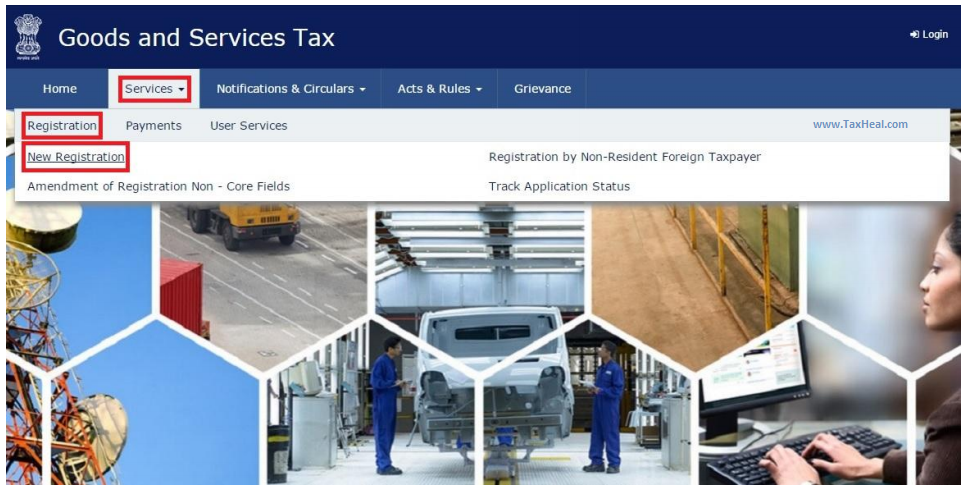
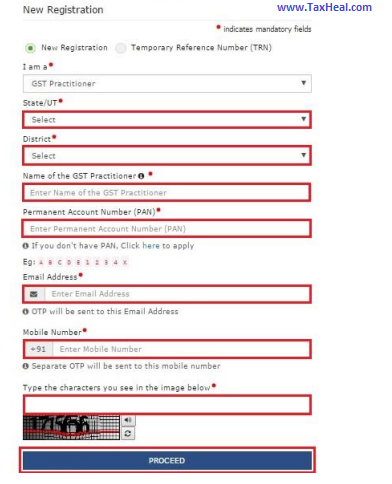
1. Access the GST common portal www.gst.gov.in and select „New Registration‟ on the landing page of GST Portal. This form is available as pre-login feature.
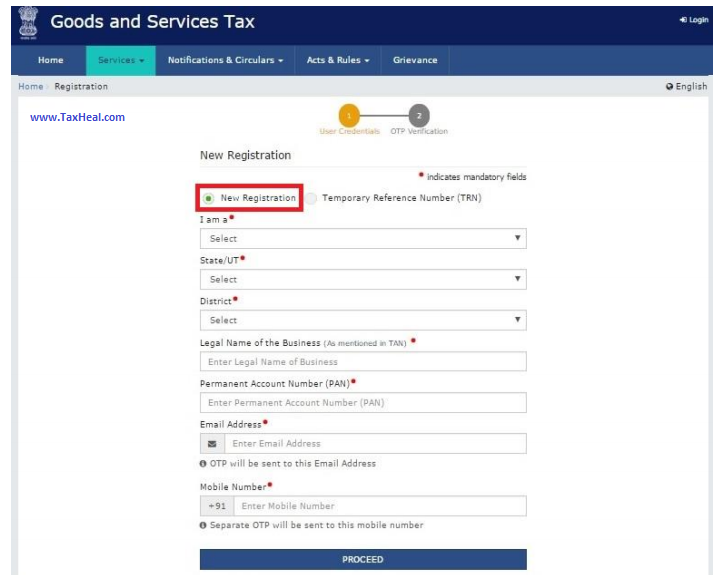
2. Select the Radio Button New Registration.
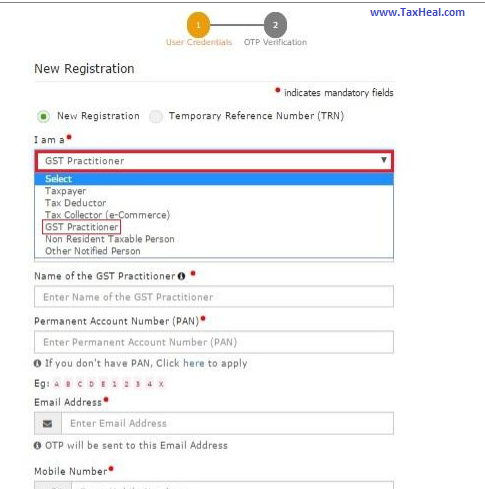
3. Select I am „GST Practitioner from the dropdown menu.
4. Fill in the details in all the fields in PART-A of the form as per the screenshot. Please note, your Name and PAN will be validated against the CBDT database. Once you have filled in all the details, enter the Captcha Code and click the PROCEED button.
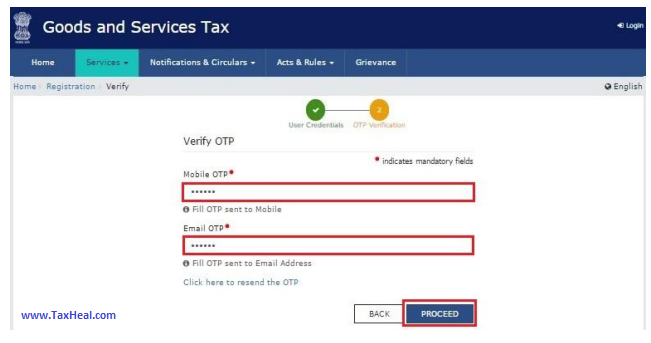
5. After successful validation, you will be directed to the next page where you will be required to enter a Mobile OTP and an E-mail OPT. The OTPs will be sent to the mobile number and e-mail ID entered in PART-A of the form. Enter the OTPs and click PROCEED.
6. You will be issued a 15-digit Transaction Reference Number (TRN). It will be sent to you via e-mail and SMS and below the TRN the expiry date of the TRN will also be mentioned, do take note of that. Click PROCEED.
7. After clicking PROCEED, the system will send you an OTP on your e-mail and mobile and you will be directed to a fresh page where you will enter the OTP, enter the Captcha Code, and click PROCEED.
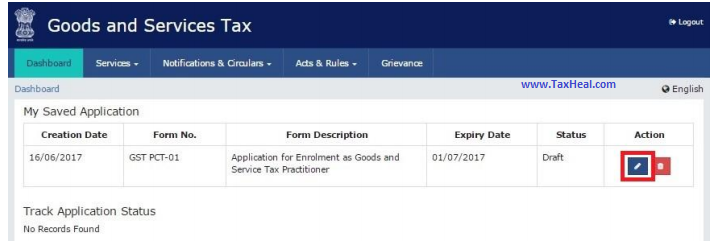
8. After clicking PROCEED, you will be directed tothe My Saved Application page from where you can access PART-B of the Registration Application for GST Practitioner. Click on the EDIT icon to access the form.
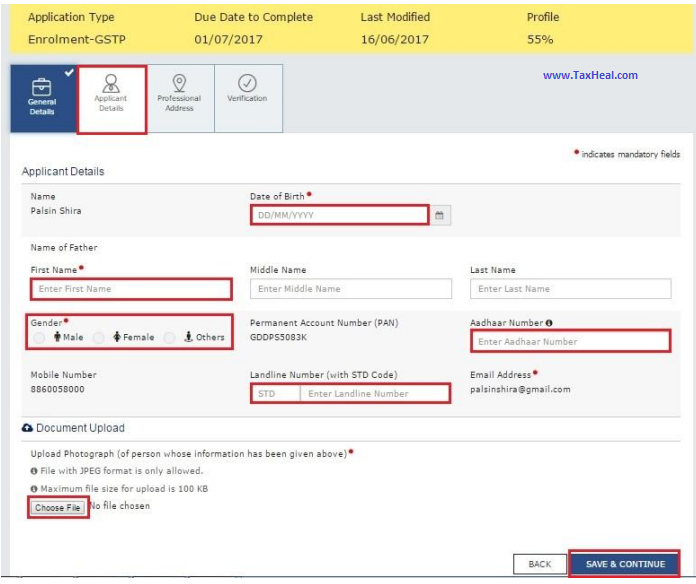
9. PART-B of the form has four sections that must be filled sequentially. The first section is General Details. Enter all the details and click SAVE AND CONTINUE at the bottom of the screen. 9Under enrolment sought as, please select an option from the dropdown given.
10. The second section is Applicant Details. Enter all the details and upload your photograph. Ensure that your photograph is in JPEG format and the file size is less than 100 KB. No click SAVE AND CONTINUE at the bottom of the screen.
11. The third section is Professional Address. Enter all the details and click SAVE AND CONTINUE at the bottom of the screen.
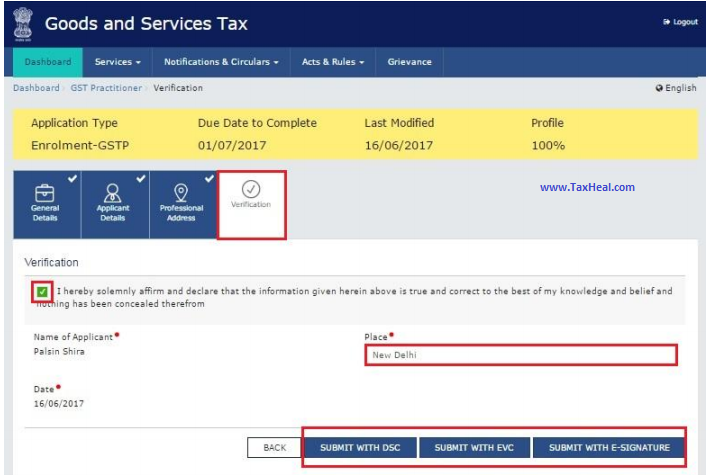
12. The fourth and last section is the Verification page. Check the check-box and enter the place. You may now choose to submit the form using DSC, E-Sign or EVC. (Note: For ESign and EVC you must update your Aadhaar number in the Applicant Details section)
In Case of DSC:
a) Click the SUBMIT WITH DSC button.
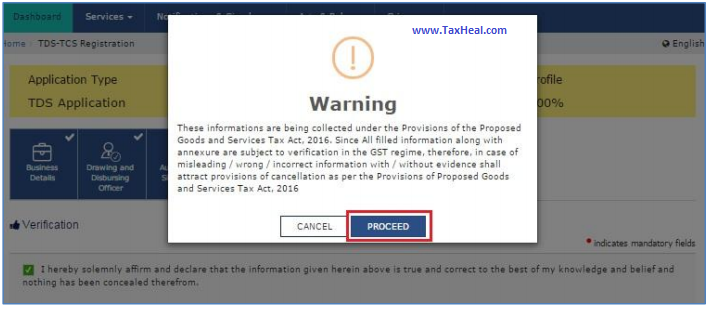
b) Click the PROCEED button.
Note:
Make sure your DSC dongle is inserted in your laptop/ desktop.
Make sure emSigner (from eMudra) is running on your laptop/ desktop with administrator permissions.
To check if the emSigner is running on your laptop/ desktop, perform the following steps:
1. Click the item tray.
2. Double click the emSigner icon.
3. Click the Hide Service button to minimize the dialog box.
g) Select the certificate and click the SIGN button.
Note: To view the details of your DSC, click the View Certificate button.
You will receive the acknowledgement in next 15 minutes on your registered e-mail address and mobile phone number. Application Reference Number (ARN) receipt is sent on your e-mail address and mobile phone number.
You can track the status of your application using the Services>Registration> Track Application Status command.
In Case of E-Signature:
e) Click the SUBMIT WITH E-SIGN button.
f) In the Declaration box, click the AGREE button.
Note: OTP will be sent to your e-mail address and mobile phone number registered with Aadhaar.
g) Verify Aadhaar OTP screen is displayed. Enter the OTP received on your e-mail address and mobile phone number registered with Aadhaar.
h) Click the CONTINUE button..
The success message is displayed. You will receive the acknowledgement in next 15 minutes on your registered e-mail address and mobile phone number. Application Reference Number (ARN) receipt is sent on your e-mail address and mobile phone number.
In Case of Electronic Verification Code:
a) Click the SUBMIT WITH EVC button.
b) In the Declaration box, click the AGREE button.
Note: OTP will be sent to your mobile phone number registered with Aadhaar.
c) Verify OTP screen is displayed. Enter the OTP received on your mobile phone number registered with Aadhaar.
d) Click the CONTINUE button.
The success message is displayed. You will receive the acknowledgement in next 15 minutes on your registered e-mail address and mobile phone number. Application Reference Number (ARN) receipt is sent on your e-mail address and mobile phone number.
Note: After submission, you cannot make any changes to your application.
GST Practitioner FAQ’s
GST Practitioners – Analysis
GST Practitioner – Eligibility Criteria, Relevant forms & Procedure
Related Topic on GST
| Topic | Link |
| GST Acts | Central GST Act and States GST Acts |
| Rules | GST Rules |
| Rates | GST Rates |
| Notifications | GST Act Notifications |
| Press Release | GST Press Release |
| Commentary | Topic wise Commentary on GST Act of India |
The post How do I apply for enrolment as GST Practitioner – Explained with Screenshots appeared first on Tax Heal.
from Tax Heal https://ift.tt/2wxsgjJ




No comments:
Post a Comment